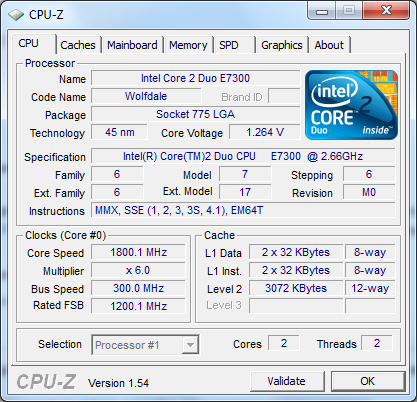
CPU-Z is a free utility that provides detailed information about your computer’s processor, including clock speed, cache size, and more. This information can be useful for gamers, system builders, and overclockers who want to monitor their processor performance and ensure that it is running smoothly. In this guide, we will walk you through the process of downloading, installing, and using CPU-Z to get the most out of your processor.
Installation
Before you can start using CPU-Z, you will need to download and install the software. Here are the steps to follow:
- Step 1: Go to the official CPU-Z website.
- Step 2: Click on the “Download latest version” button to download the latest version of the software.
- Step 3: Once the download is complete, open the setup file and follow the on-screen instructions to install CPU-Z on your computer.
Configuration
Once you have installed CPU-Z, you can begin configuring the software to display the information that you want to see. Here are the basic steps to follow:
- Step 1: Launch CPU-Z by double-clicking on the executable file.
- Step 2: Click on the “CPU” tab to view the processor information for your computer.
- Step 3: Check the boxes next to the items that you want to monitor. You can choose from options such as clock speed, cache size, and voltage.
- Step 4: Click on the “About” tab to view information about your CPU-Z version and CPU manufacturer.
Monitoring
Once you have configured CPU-Z to display the information that you want to see, you can begin monitoring your processor performance. Here are the basic steps to follow:
- Step 1: Launch CPU-Z by double-clicking on the executable file.
- Step 2: Click on the “CPU” tab to view the processor information for your computer.
- Step 3: Monitor the processor readings in real-time to ensure that your processor is performing as expected. You can use the “Benchmark” tab to test your processor’s performance.
Troubleshooting
If you encounter any issues while using CPU-Z, here are some troubleshooting tips to help you resolve them:
- Issue 1: CPU-Z is not displaying any information for my processor.
- Solution: Make sure that you have installed the latest drivers for your motherboard and processor. You should also check that your processor is properly seated in the socket and that its power cables are properly connected.
- Issue 2: CPU-Z is displaying incorrect information for my processor.
- Solution: Check that your BIOS settings are optimized for the best performance. You should also ensure that your processor is not overheating or being throttled due to power limits.
- Issue 3: CPU-Z crashes or freezes while in use.
- Solution: Try reinstalling the software or updating your operating system. If the problem persists, you may need to contact the CPU-Z support team for further assistance.
Conclusion
CPU-Z is a powerful utility that provides detailed information about your computer’s processor performance. By following the steps outlined in this guide, you should be able to install, configure, and use CPU-Z to monitor your processor and ensure that it is running smoothly. Remember to optimize your BIOS settings and monitor your processor performance regularly to get the most out of your hardware.
It’s important to note that overclocking and monitoring your processor can be risky and can potentially damage your hardware. Always do your research and understand the risks involved before making any changes to your hardware. With the right tools and knowledge, CPU-Z can be a valuable asset in your system building and overclocking journey.