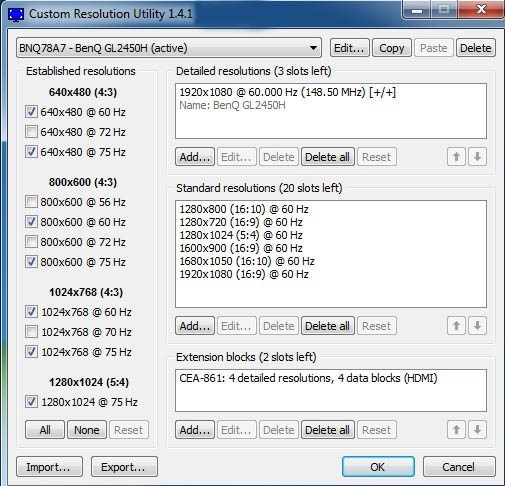
Custom Resolution Utility (CRU) is a free software tool developed by ToastyX that allows users to create custom resolutions and refresh rates for their displays. The program can be used to bypass the default resolution and refresh rate limits set by graphics drivers or to add new resolutions that are not available by default.

CRU works by editing the display’s EDID (Extended Display Identification Data), which is a data structure used by the monitor to communicate with the graphics card. By modifying the EDID, CRU allows users to create custom resolutions and refresh rates that are not supported by the monitor’s default settings. The tool also allows users to adjust the pixel clock and timing parameters, which are necessary for creating custom resolutions.

CRU is compatible with both AMD and NVIDIA graphics cards and supports a wide range of operating systems, including Windows, Linux, and macOS. The program is straightforward to use, and the user interface is simple and intuitive. Users can create custom resolutions by selecting the display they want to modify and entering the desired resolution and refresh rate in the program.

CRU also includes several advanced options that allow users to fine-tune their custom resolutions further. For example, users can adjust the horizontal and vertical sync polarity, which can affect the image quality and stability. The tool also includes a preview feature that allows users to see how their custom resolutions will look before applying them.

Custom Resolution Utility (CRU) settings

Overall, Custom Resolution Utility is a useful tool for users who need to create custom resolutions and refresh rates for their displays. However, users should be cautious when using CRU as modifying the EDID can cause compatibility issues with certain monitors or graphics cards. It is always best to research the monitor and graphics card compatibility before making any changes to the EDID.

How to use Custom Resolution Utility

  • Download and install Custom Resolution Utility from the trust website.
  • Launch Custom Resolution Utility by double-clicking on the CRU.exe file.
  • Click the “Add” button to create a new custom resolution.
  • Enter the desired resolution and refresh rate for your display. Make sure that the values are supported by your graphics card and monitor. You can also specify the timings manually if necessary.
  • Click the “OK” button to save the custom resolution.
  • Click the “Restart” button to restart your graphics driver.
  • Once your graphics driver has restarted, select the new custom resolution in your display settings. If you are using multiple monitors, make sure to select the correct display.
  • Test the new resolution to make sure that it works correctly. If there are any issues, you can delete the custom resolution and try a different one.
  • Custom Resolution Utility also allows users to create and save multiple custom resolutions, which can be useful if you need different settings for different applications or games. Additionally, the software includes advanced options for expert users, such as the ability to create custom EDID (Extended Display Identification Data) profiles.

Overall, Custom Resolution Utility is a powerful tool that can help users to get the most out of their displays by creating and adding custom resolutions. However, it is important to note that using unsupported resolutions can potentially damage your monitor or graphics card, so use caution and make sure to research the specifications of your hardware before attempting to add custom resolutions.

You may also find this useful