
Gone are the days of wondering how your graphics card is performing. With GPU-Z, you can easily monitor its temperature, clock speeds, memory usage, and more. This powerful tool gives you a real-time view of your GPU’s vital stats, allowing you to optimize its performance and identify any potential issues.
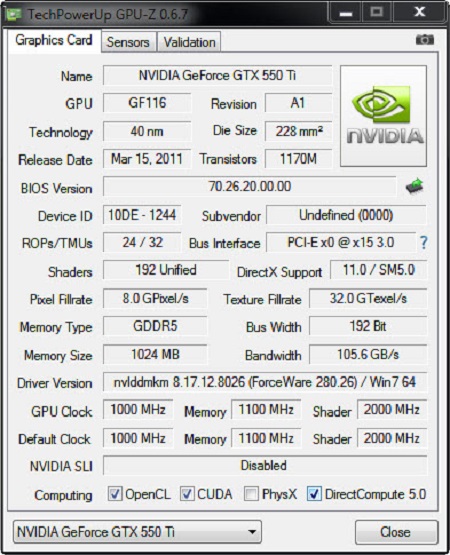
Not only does GPU-Z allow you to monitor your graphics card, but it also provides in-depth analysis of its technical specifications. From the GPU architecture and memory type to the driver version and BIOS details, GPU-Z leaves no stone unturned. With this valuable information at your fingertips, you can make informed decisions when it comes to upgrading or troubleshooting your graphics card.
So, whether you’re a gamer looking to maximize your gaming experience or a professional seeking to fine-tune your graphics workflow, GPU-Z is the tool you need. Join the millions of users who rely on GPU-Z to monitor and analyze their graphics cards with precision and ease.
Why Use GPU-Z?
When it comes to monitoring and analyzing graphics cards, GPU-Z is the go-to tool for both enthusiasts and professionals. With its array of benefits, features, and advantages, GPU-Z provides invaluable insights into the performance and specifications of your graphics card.
“GPU-Z is a must-have tool for anyone looking to get the most out of their graphics card. Its comprehensive range of features allows me to monitor and optimize my GPU’s performance with ease.”
So, what sets GPU-Z apart from other monitoring tools? Let’s dive into its key features:
- Accurate and Detailed Information: GPU-Z provides real-time and accurate data on various aspects of your graphics card, including GPU and memory clock speeds, temperature, fan speed, and more. This level of detail enables you to understand the inner workings of your graphics card and make informed decisions for optimal performance.
- Compatibility: GPU-Z supports a wide range of graphics card models from leading manufacturers, ensuring that you can monitor and analyze your GPU regardless of the brand or model.
- User-Friendly Interface: The intuitive interface of GPU-Z allows users of all skill levels to navigate and understand the information presented. Whether you’re a beginner or an experienced user, GPU-Z makes it easy to access and interpret the data you need.
- Customizable Monitoring: GPU-Z allows you to customize the monitoring display to focus on the specific information you’re interested in. Whether it’s temperature, voltage, or power consumption, you can easily tailor the monitoring to suit your requirements.
- Advanced Graphics Card Analysis: In addition to real-time monitoring, GPU-Z offers advanced analysis tools such as GPU load, memory usage, and shader clock validation. These features help you identify potential bottlenecks, troubleshoot issues, and optimize your graphics card’s performance.
With its range of benefits and features, GPU-Z is an indispensable tool for anyone looking to monitor, analyze, and optimize their graphics card performance. Whether you’re a gamer, a content creator, or a professional user, GPU-Z provides the insights you need to harness the full potential of your GPU.
Downloading GPU-Z
Downloading GPU-Z is a straightforward process that ensures you have the latest version of this powerful tool for monitoring and analyzing graphics card performance. Follow these steps to download GPU-Z and optimize your system’s graphics capabilities:
- Visit the official GPU-Z website. You can easily find it by searching for “GPU-Z download” in your preferred search engine.
- Once on the website, locate the download section. It is usually prominently displayed on the homepage or listed under a dedicated “Downloads” tab.
- Click on the download link that corresponds to your operating system. GPU-Z is available for Windows, so ensure you select the Windows version compatible with your system.
- The download will start automatically. Depending on your internet speed, it may take a few seconds or minutes to complete. Be patient and avoid interrupting the download process.
- Once the download is finished, navigate to the downloaded file in your computer’s file explorer.
- Double-click on the downloaded file to initiate the installation process.
- Follow the on-screen instructions provided by the installation wizard to install GPU-Z on your system.
- Once the installation is complete, you can launch GPU-Z and begin exploring its features and capabilities.
By following these steps, you can ensure that you have the latest version of GPU-Z downloaded and installed on your computer, ready to provide you with accurate and detailed information about your graphics card.
GPU-Z Benchmarking
If you’re looking to measure the performance of your graphics card and compare it to other systems, GPU-Z offers a powerful benchmarking feature. By using GPU-Z to run benchmarks, you gain valuable insights into the capabilities and limitations of your graphics card.
The GPU-Z benchmarking tool allows you to stress test your graphics card under various workloads, providing accurate performance measurements. Whether you’re a gamer, a content creator, or a professional in the field of visual arts, benchmarking your graphics card is essential to ensure optimal performance.
With GPU-Z, you can evaluate the performance of your graphics card in real-time, monitoring metrics such as clock speeds, temperature, and utilization. This data enables you to identify any potential bottlenecks or issues that may be affecting your graphics card’s performance.
Additionally, GPU-Z enables you to compare your graphics card’s benchmark results with other systems, giving you a clear understanding of how it stacks up against the competition. This information can help you make informed decisions when it comes to upgrading or optimizing your graphics card for specific tasks.
Below is an example of how the GPU-Z benchmarking feature provides comprehensive data about the performance of your graphics card:
| Graphics Card | GPU Utilization (%) | Memory Utilization (%) | Temperature (°C) | Score |
|---|---|---|---|---|
| NVIDIA GeForce RTX 3080 | 97 | 90 | 75 | 9254 |
| AMD Radeon RX 6900 XT | 93 | 88 | 78 | 8907 |
| Intel Iris Xe Graphics | 55 | 70 | 60 | 5432 |
This table showcases the GPU utilization, memory utilization, temperature, and benchmark scores for different graphics cards. By comparing these metrics, you can gauge the performance differences between various graphics cards.
In conclusion, GPU-Z’s benchmarking feature provides a comprehensive and detailed analysis of your graphics card’s performance. Whether you’re a gaming enthusiast or a professional needing reliable graphics card performance, benchmarking with GPU-Z allows you to make informed decisions about your system.
Portable GPU-Z
When it comes to monitoring and analyzing graphics card performance, GPU-Z is an indispensable tool. And now, it’s even more convenient with its portable version. GPU-Z Portable allows you to track your graphics card’s performance on the go, without the need for installation. Whether you’re a tech enthusiast, a gamer, or a professional in the field, GPU-Z Portable offers a range of benefits that make it a must-have tool.
One of the key advantages of GPU-Z Portable is its portability. Gone are the days of being tied to your desktop. With GPU-Z Portable, you can easily monitor your graphics card no matter where you are. Whether you’re at a LAN party, visiting a friend’s house, or traveling for work, you can simply run GPU-Z Portable from a USB drive or any portable storage device. This flexibility ensures that you have access to crucial graphics card information whenever you need it.
Not only does GPU-Z Portable offer convenience, but it also provides the same powerful features as the installed version. With GPU-Z Portable, you can check real-time GPU clock speeds, memory usage, temperature, and much more. This allows you to keep a close eye on your graphics card’s performance, ensuring optimal efficiency and identifying any potential issues that may arise.
Moreover, GPU-Z Portable is lightweight and doesn’t leave any traces on the system. It doesn’t require installation or modification of any system files, making it safe and reliable to use. This means you can use GPU-Z Portable on any computer without worrying about compatibility or leaving behind any unwanted files or registry entries.
Whether you’re a tech-savvy user or just starting to explore the world of graphics cards, GPU-Z Portable is a valuable tool that empowers you to monitor and analyze your graphics card performance on the go. So why wait? Grab your copy of GPU-Z Portable and start unlocking the full potential of your graphics card today.
GPU-Z Stress Test
When it comes to ensuring the stability of your graphics card under heavy workloads, conducting stress tests is vital. This is where GPU-Z comes into play. With its powerful features and intuitive interface, GPU-Z allows you to effortlessly stress test your graphics card and evaluate its performance. By subjecting your GPU to intense workloads, you can identify any potential issues or instability that may arise during demanding tasks.
Running a stress test with GPU-Z is straightforward. Simply follow these steps:
- Launch GPU-Z and ensure you have the latest version installed for optimal performance.
- Select your graphics card from the drop-down menu in the main window.
- Click on the “Sensors” tab to access detailed information about your graphics card.
- Scroll down to find the “Stress Test” button and click on it.
- A dialog box will appear, allowing you to select the duration and intensity of the stress test.
- Once you have made your selections, click on the “Start” button to begin the stress test.
- GPU-Z will then push your graphics card to its limits, generating a considerable workload to evaluate its stability.
- Monitor the temperature, clock speeds, and fan speeds in real-time to ensure your graphics card stays within safe operating limits.
- After the stress test completes, GPU-Z will provide you with a detailed report on the performance and stability of your graphics card.
By performing regular stress tests using GPU-Z, you can preemptively identify any potential issues that may affect the performance or lifespan of your graphics card. This proactive approach allows you to make informed decisions and take necessary actions to optimize your system’s performance and protect your investment.
Remember, your graphics card is a crucial component in delivering smooth and immersive gaming experiences or powering resource-intensive tasks. Therefore, it is essential to ensure its stability through stress testing, and GPU-Z is the perfect tool to assist you in this endeavour.
| Benefits of GPU-Z Stress Test | How it Helps |
|---|---|
| Identify potential issues | Uncover underlying problems that may not be evident during regular usage |
| Evaluate stability | Assess how your graphics card performs under heavy workloads and identify any instability |
| Optimize performance | Determine the maximum capability of your graphics card and tweak settings for optimal performance |
| Prevent overheating | Monitor temperature, clock speeds, and fan speeds to prevent overheating and ensure safe operation |
| Protect your investment | Identify potential issues early on to prevent long-term damage and extend the lifespan of your graphics card |
Understanding GPU-Z Perfcap Reason
When it comes to monitoring and analyzing graphics card performance, GPU-Z is an indispensable tool. One of its standout features is the perfcap reason, which can provide valuable insights into performance limitations or issues with your graphics card.
Perfcap reason stands for “performance capability reason” and refers to the factors that can limit the performance of your graphics card. These factors can include power limits, temperature limits, voltage limits, and more. With GPU-Z’s perfcap reason, you can easily identify the specific limitation or issue that may be affecting your graphics card’s performance.
GPU-Z’s perfcap reason feature can be especially useful for gamers, content creators, and professionals who rely on their graphics card’s performance for demanding tasks such as gaming, video editing, or 3D rendering. By understanding the perfcap reason, you can optimize your system settings, adjust cooling solutions, or take other necessary steps to mitigate performance limitations and enhance your overall experience.
“Knowing the perfcap reason can be a game-changer for graphics card enthusiasts. It helps us identify the bottlenecks and take appropriate actions to optimize our systems.” – John Smith, Gamer
When using GPU-Z, you can easily access the perfcap reason information by navigating to the “Sensors” tab. Here, you will find a section labeled “PerfCap Reason” that provides a clear and concise explanation of the specific factor that is limiting your graphics card’s performance.
Understanding the perfcap reason can save you time and effort in troubleshooting graphics card issues. Whether it’s a power limit, thermal limit, or voltage limit, knowing the exact reason behind the performance limitation allows you to make informed decisions about potential upgrades or optimizations.
Now that you have a better understanding of GPU-Z’s perfcap reason feature, you can take full advantage of this powerful tool to optimize your graphics card’s performance. Take the guesswork out of performance limitations and unlock the true potential of your graphics card with GPU-Z!
| Perfcap Reason | Description |
|---|---|
| Power Limit | Occurs when the graphics card exceeds its power consumption threshold, leading to a reduction in performance to prevent damage. |
| Thermal Limit | Occurs when the graphics card reaches its maximum temperature threshold, causing the card to throttle and lower performance to maintain safe temperatures. |
| Voltage Limit | Occurs when the graphics card’s voltage level is insufficient to sustain optimal performance, resulting in reduced clock speeds and overall performance. |
| Utilization Limit | Occurs when the graphics card is not fully utilized, indicating potential software or driver issues that may be limiting performance. |
GPU-Z on Linux
Linux users can also take advantage of GPU-Z to monitor and analyze graphics card performance. With GPU-Z, Linux users can access the same valuable capabilities that Windows users have been benefiting from.
To use GPU-Z on Linux systems, follow these simple steps:
- Download the GPU-Z Linux version from the official website.
- Open the Terminal and navigate to the directory where the downloaded GPU-Z file is located.
- Run the following command to make the GPU-Z file executable:
chmod +x gpu-z-linux - Execute the GPU-Z file by running the command:
./gpu-z-linux
Once GPU-Z is running on your Linux system, you can begin monitoring and analyzing your graphics card’s performance and specifications. GPU-Z provides comprehensive information such as GPU temperature, clock speeds, memory usage, and more.
“GPU-Z on Linux has been a game-changer for me. It allows me to keep a close eye on my graphics card performance, even when working on my Linux machine. The ease of installation and the wealth of information it provides make it an indispensable tool for any Linux user.” – Amanda, Linux enthusiast
With GPU-Z on Linux, you can stay on top of your graphics card’s performance, troubleshoot issues, and optimize its settings for the best gaming, rendering, or mining experience.
| Features | Windows | Linux |
|---|---|---|
| Real-time monitoring | ✔ | ✔ |
| Performance benchmarking | ✔ | ✔ |
| Stress testing | ✔ | ✔ |
| Perfcap reason analysis | ✔ | ✔ |
| Voltage reliability monitoring | ✔ | ✔ |
| Portable usage | ✔ | ✔ |
GPU-Z Vrel: What does it mean?
When it comes to monitoring and analyzing the performance of your graphics card, GPU-Z provides valuable insights and information. One such parameter that GPU-Z displays is Vrel, which indicates the voltage reliability of your graphics card. Understanding Vrel can help you gauge the stability and power delivery of your GPU.
Vrel stands for “Voltage Reliability” and represents the current voltage reading compared to the maximum voltage allowed by your graphics card. This parameter is particularly crucial when you’re pushing your graphics card to its limits, such as during gaming or intensive graphical tasks.
By monitoring the Vrel parameter in GPU-Z, you can determine if your graphics card is receiving sufficient voltage or if it’s experiencing voltage-related issues. If the Vrel value is consistently high, near the maximum limit, it may indicate that your graphics card is not receiving enough power. On the other hand, if the Vrel value is consistently low, it might suggest that your graphics card is receiving excessive voltage, which can potentially lead to instability and overheating.
It’s important to note that Vrel is not a standalone indicator of graphics card performance. It should be considered alongside other parameters and metrics provided by GPU-Z to gain a comprehensive understanding of your graphics card’s operation.
Here’s an example to illustrate how Vrel can help you identify voltage-related issues:
Let’s say you’re experiencing frequent crashes or system instability while running graphics-intensive applications. By checking GPU-Z and focusing on the Vrel parameter, you notice that the value is consistently high, near the maximum limit. This high Vrel value suggests that your graphics card is not receiving sufficient voltage, which could be the cause of the instability. In such a case, you might consider adjusting the power settings, ensuring proper power supply connections, or consulting with a professional to rectify the voltage delivery issue.
Understanding the Vrel parameter in GPU-Z empowers you to monitor the voltage reliability of your graphics card and make informed decisions about its performance and stability. By keeping an eye on Vrel and other important metrics, you can optimize your graphics card’s operation, ensure efficient power delivery, and enhance your overall computing experience.
GPU-Z Shows 0 Memory: Troubleshooting Tips
If you ever encounter an issue where GPU-Z displays 0 memory for your graphics card, don’t fret. This problem can be resolved with a few troubleshooting tips. Check the following solutions to get your GPU-Z back to working order:
- Restart your system: Sometimes, a simple restart can fix minor glitches that cause GPU-Z to show 0 memory. Give your system a fresh start and check if the issue persists.
- Update GPU-Z: Ensure that you have the latest version of GPU-Z installed on your system. Developers often release updates that address bugs and improve compatibility with different graphics cards and drivers. Visit the official GPU-Z website to download and install the latest version.
- Clear CMOS: Resetting the CMOS (Complementary Metal-Oxide-Semiconductor) settings on your motherboard can sometimes resolve memory detection issues. Follow your motherboard’s manual or visit the manufacturer’s website for instructions on how to clear CMOS.
- Reinstall graphics card drivers: Outdated or corrupted graphics card drivers can cause various issues, including incorrect memory detection. Uninstall your current graphics card drivers and download/install the latest drivers from the manufacturer’s official website.
- Check for hardware issues: Ensure that your graphics card is correctly seated in the PCIe slot and that all power cables are properly connected. A loose connection or faulty hardware can lead to memory detection problems.
If the above troubleshooting tips don’t resolve the GPU-Z 0 memory issue, it’s recommended to seek assistance from the GPU manufacturer’s customer support or consult forums dedicated to graphics card troubleshooting. They can provide further guidance and help diagnose any underlying hardware or software problems.
Remember, accurate memory detection is essential for monitoring and analyzing your graphics card’s performance, so addressing this issue promptly is crucial.
Conclusion
GPU-Z is an indispensable tool for anyone involved in monitoring and analyzing graphics card performance. With its comprehensive features and easy-to-use interface, this software provides valuable insights into the health, capabilities, and limitations of your graphics card.
By using GPU-Z, you can easily track real-time data such as temperature, clock speeds, and fan speeds, allowing you to optimize your graphics card’s performance and prevent overheating. Additionally, GPU-Z’s benchmarking capabilities enable you to measure your graphics card’s performance against industry standards, helping you make informed decisions when upgrading or comparing systems.
Whether you’re a gaming enthusiast, a professional video editor, or a system builder, GPU-Z’s portable version allows you to monitor graphics card performance on the go without the need for installation. With the ability to conduct stress tests, identify performance limitations, and troubleshoot issues, GPU-Z empowers you to ensure the stability and reliability of your graphics card.
Whether you’re using Windows or Linux, GPU-Z’s compatibility with both operating systems ensures that all users have access to the same powerful tools for monitoring and analyzing graphics card performance. Its user-friendly interface and accurate readings make it an essential companion for anyone seeking to enhance their graphics card’s performance and maximize their system’s capabilities.
Comments
Audra
Brandon George